Shopify store opening guide from 0 to 1
Free 14 days Shopify shop application,
https://www.shopify.com/?ref=laoqu
In general, the main steps to open a shop on shopify are as follows:
Step 1: Discover profitable niche products
Step 2: Choose a supplier
Step 3: Shopify registration and planning
Step 4: shopify store configuration and design
Step 5: Upload products
Part 6: Add payment method
Part 7: Configure store freight
Step 8: Add gift cards and discount codes
Step 9: Set customer service options
Step 10: Start the store
What is dropshipping?
Regarding dropship, the previous article is very detailed. If you are interested, you can click to find out
Dropshipping everything you need to know
Dropshipping is different from the traditional e-commerce model. It is an e-commerce model that can complete order transactions without inventory. If a customer places an order.
The dropshipping seller will forward the order to the supplier, and then the supplier will ship the product to the customer in the name of the seller. The dropshipping seller acts as a middleman.
Advantages of dropshipping
- Reduce risk-because dropshipping does not need to prepare inventory in advance, it also reduces the impact of product price fluctuations and product obsolescence.
- Reduce costs-zero inventory eliminates the cost of warehouses, etc., and dropshippers can work anywhere, all activities only use a computer and an online shop.
- Convenient and fast—because the supplier directly delivers the goods to the customer, dropshippers do not need to participate in the transportation link, which helps make the logistics process more convenient and efficient, and can also reduce logistics costs.
Where can I find a dropshipping supplier?
Dropshippers are selling goods on behalf of their suppliers in the market, and suppliers provide dropshippers with the source of orders, so dropshippers and suppliers are in a symbiotic relationship.
Then, finding the right supplier is very important for the dropshipping business. There can be more than one supplier, but you must find a reliable one. You can go to AliExpress, 1688 or Spocket to find a supplier.
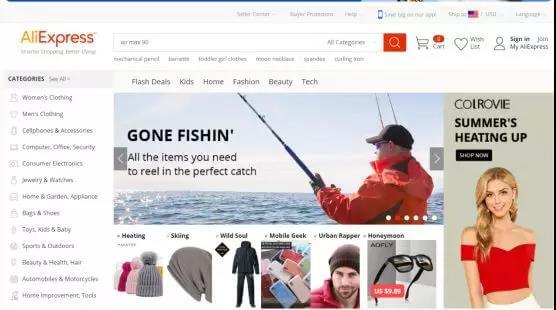
AliExpress is a retail service website located in China, which can provide goods retail services to the world. There are now a large number of small businesses looking for suppliers on AliExpress.
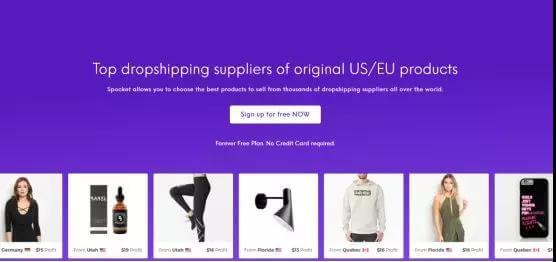
Spocket is essentially a digital supplier website, very suitable for dropshippers in Europe and the United States, because this network is mainly located in the United States and the European Union, but international shipping channels are also being established.
The first step: product selection
Choosing a product is very important. It cannot be said that you can just find a product and start selling. Only when you choose the right product can you have good profits and increase your income.
Regarding the selection, you can refer to a few suggestions:
- The price is between 1-20 US dollars. When choosing such a low-priced product, the supplier may also charge a certain intermediate fee. Of course, you can increase the price on the basis of the wholesale price to increase profits. In addition, you can reduce unnecessary costs to increase profits.
- Target high-end customers. Product selection is aimed at high-end customers, which requires you not only to look at the purchasing power of customers, but also their disposable income when choosing products. The middle class will be a very good market. With an average annual income of about 50,000 to 140,000, they are likely to buy goods that exceed their expectations.
- Choose non-branded products. Because the product market with a strong brand is almost monopolized by this brand, it is difficult to penetrate again. If you want to make more money, you must find non-branded products, so that your chances of winning will be greater.
Tools to find niche products
The above is a basic overview of choosing niche products. The following tools can help you find the right product.
Google Keyword Planner
Everyone knows that searching on Google can get a lot of traffic and conversions for those websites that rank high in keyword searches.
Therefore, when selecting products, you should study more keywords. The Google Keyword Planner tool can use keyword data to determine niche products.
Mainly reflected in two aspects:
- Find keywords: Get useful keyword tips to better reach users who are interested in your products or services.
- Get search volume and forecast data: View keyword search volume and other historical indicators, as well as forecast data for the keyword's future performance.
First log on to this website, you will be able to see the overview of the keyword search volume, and you can find keywords with high search volume. If you rank selected keywords, you can increase your chances of identifying customers.
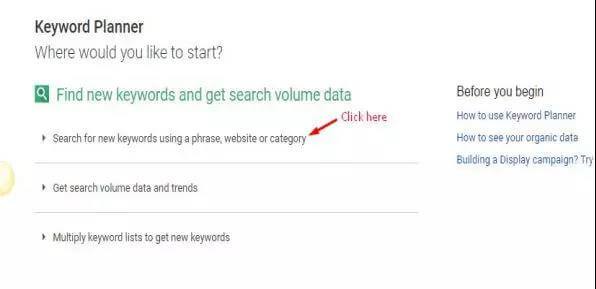
To use this tool, you must first have a Google account, and then register to use it on the homepage. After registration, click the button "Search for new keywords using words, websites, and categories". Then you can enter the products you want to sell.
Example: I want to find a retailer, and then I will enter "watch" in the product or service column, and by identifying the category and location of the search, I can restrict the search.
Download the list of keyword tips to provide relevant keywords for your initial search. I will use the keyword "wrist watch for men" to follow the search results.
SEM Rush
SEM Rush is the most comprehensive SEO tool at the moment. It has keyword ranking tracking, keyword research, long-tail word research, external chain mining, PPC advertising research, traffic research, industry hot article search, etc. Features.
SEM Rush is not only rich in functions, but each function is among the top three in the world, which is really powerful.
SEM Rush is a paid tool that can extract a limited number of keywords from keyword difficulty.
After registering a login account, enter the keyword wrist watch for men, click search to view the information in the search bar.
Once the page loads, scroll down and click "View Full Report" in the "Phrase Match" keyword section.
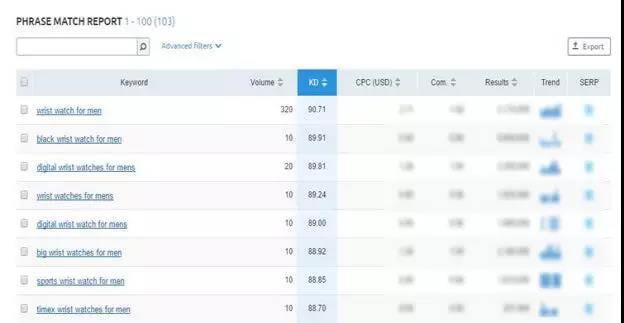
The related keywords and different parameters are displayed on the report page. The first column is related keywords, the second column is the number of each keyword, and the third column is KD. The lower the density of the keyword (KD), the easier it is to classify this keyword.
KD is ranked from high to low, that is, the difficulty of classification is from difficult to easy. The KD of "wrist watch for men" is 90.71, ranking first and the most difficult to classify.
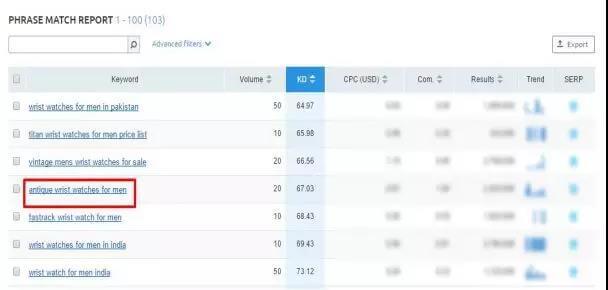
So let's consider other keywords with lower KD density values. Click the KD item to sort them from easy to difficult.
From the results, we can see that the keyword difficulty of "antiquity wrist watches for men" is 67.03, so its search results should be easier to categorize.
Because antiquity wrist watches for men are men’s antique watches, the scope of the watch should be narrowed down to the old-style watches to adjust these data. Search Spocket and AliExpress respectively.
Spocket
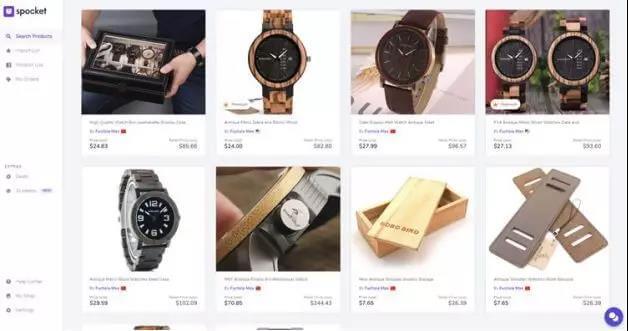
Several antique watches on sale were found on Spocket.
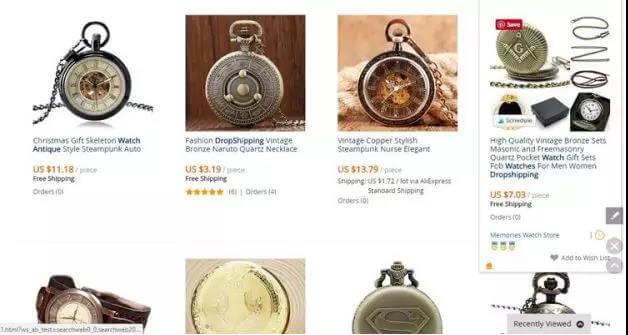
Enter "dropshipping antique watches" in the AliExpress search bar. It can be seen that the price of antique watches on AliExpress is in the range of $1-20.
Although most of the items shown on AliExpress are pocket watches, there are also some watches. So when we optimize the keywords of "antiquarian men's wristwatches", it is relatively easy to rank, so this product is very suitable for sale in our store.
Because we want to ensure that the store ranks high, when viewing the search results, in addition to the number, we must pay more attention to the KD density. Keywords with lower KD density will be easier to rank.
Step 2: Choose a supplier
After choosing a niche product, you should find a reliable supplier for the dropshipping store. I mentioned above that you can use AliExpress and Spocket to select suppliers.
The first choice for direct sales supply in Shopify is AliExpress. It is very simple to use AliExpress to find suppliers.
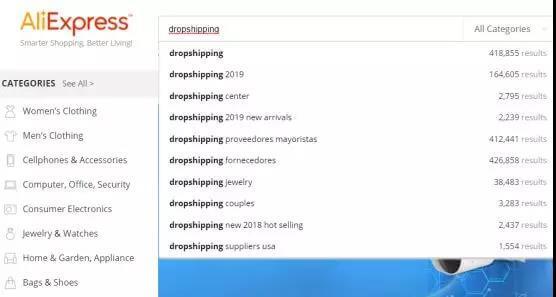
Enter dropshipping in the search bar of AliExpress, there will be many results, these results can be used as a reference.
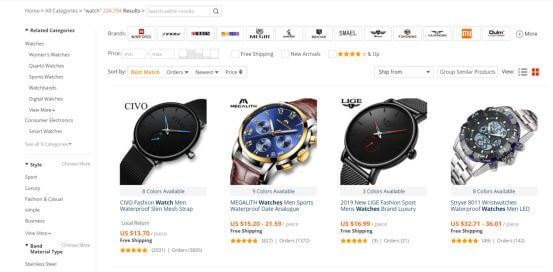
Here we search watch to see, there are many watches that sell for less than $20, which are suitable for dropshipping shop products.
You can see the star rating of the product under the price, which is based on user feedback. Generally speaking, the higher the star rating, the more reliable the supplier of this product.
On the right, you can also see the number of users and orders of this supplier. Pay attention to how many people rank it.
Recommendation: Find products that are highly rated by users. If only a few people give good reviews to this product, then you have to look for products with slightly more reviews and high star ratings, so that you can choose a better product.
To sell products on shopify, as mentioned above, do not sell branded products. But from the description alone, it is difficult to tell whether a product is a brand-name imitation product. The best way is to avoid such products altogether.
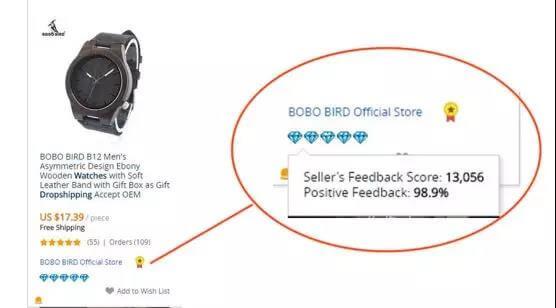
In addition to product quality, the efficiency and reliability of suppliers must also be considered. So you should also pay attention to the supplier's diamond grade below the product rating. The higher the grade, the better the reliability. Generally speaking, this rating should be at least 95%, which is a good indicator of supplier reliability.
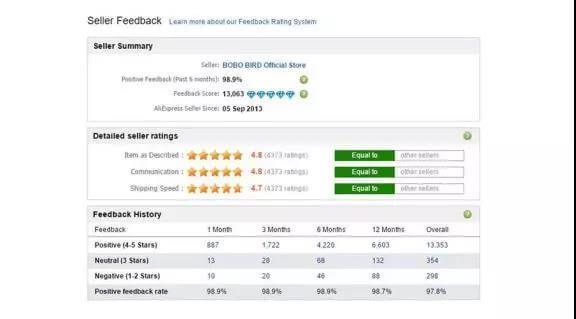
By measuring the above indicators, you can lock a few suppliers, then you can start to contact the suppliers, communicate and get direct feedback.
To select a supplier, it is best to order some samples from the supplier to see if the purchase process is convenient enough and the quality of the product. And in the process of ordering samples, you can discover what your customers might expect when buying.
Step 3: Shopify account registration and planning
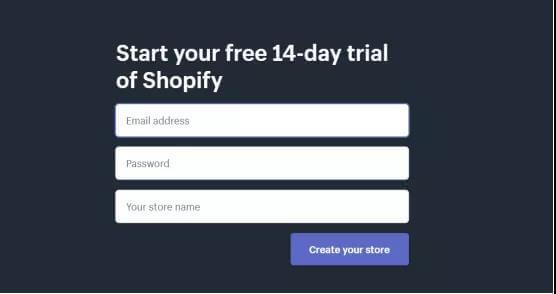
After choosing niche products and suppliers, you should go to register a Shopify store. Shopify registration is free, you need to fill in the email address, password and store name.
After successful registration, Shopify will help you solve the primary problem of opening a store and give you 4 choices:
- I do not currently sell products
- I use different systems to sell products
- I'm just playing here
- I only sell offline
Choose the first one, because now is just getting started, preparing for the future. There is also a question: What is the current annual income of your company? You can directly fill in the income as 0.
At the same time, you have to fill in personal information to complete the order data. After submitting the detailed information, you can go to the dashboard panel.
Shopify plan
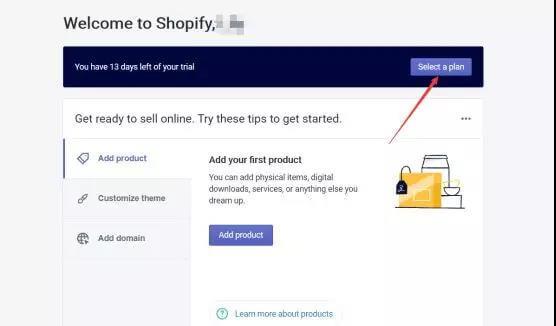
After creating a Shopify account, you also need to register for a plan to unlock all the advanced features of Shopify. After the 30-day free trial period, you can still use it normally. Click select a plan in the panel to select your plan.
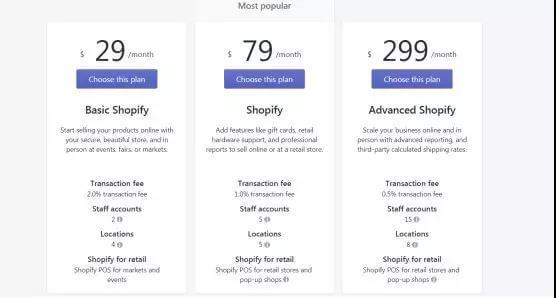
There are three plans to choose from: basic store, store, and advanced customer. Because it has just started, it is best to choose the basic Shopify plan. After your store is launched, you can also change the plan to use more features.
Step 4: Shopify store configuration and design
Now that the Shopify store has been registered, it is time to set up the store.
- Buy and set up a domain name
- Set up email forwarding
- Choose a topic
- Create essential pages
Setting the domain
name of the store Domain name will be very useful for customers. It can give customers a professional store image and can also check how the URL is read.
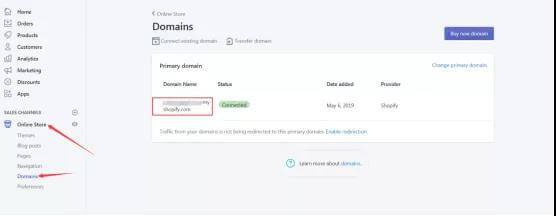
Buying a domain name can establish a store image and facilitate promotion. First, click the "domain" option in the online store and fill in your domain name.
Enter and remember your domain name in the browser to make it more convenient to use.
Well, having said so much, how to buy a domain name? You can buy new domain names from third-party service providers (such as NameCheap, GoDaddy).
Finding a third-party service provider to buy a domain name can prevent you from transferring online stores in the future. GoDaddy is the largest domain registrar, and Namecheap can provide very competitive prices and customer service.
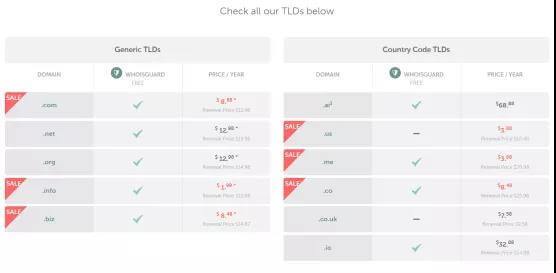
The domain name fees on NameCheap are as follows: .com domain name fees are 8.88 US dollars / year, .net and .org domain name fees are 12.98 US dollars / year.
The best thing about NameCheap is that no matter what domain name you buy, you can get a free WhoisGuard (previously $15/year), which can help hide the identity of the domain name owner.
After purchasing a domain name on a third-party platform, do a DNS resolution and point it to shopify. If you don’t know what a virtual host is, then you can buy it directly from Shopify and then automatically add it to your store, which saves time and effort. In shopify, the domain name fee is generally $9-$14/year.
Before clicking the "Buy Domain Name" button, you must first check this check box to indicate that you have agreed to the ICANN policy and DRA.
Then click the "Buy Domain Name" button, and you will receive an email notification. Click the link to indicate that you have purchased it.
Configure email
Then, when selling products on shopify, you are the middleman between the supplier and the customer. In other words, if someone asks you to place an order, you manually forward the order to the supplier, and then the supplier delivers the goods to the customer.
To set up email transmission, you need to go to the domain page and click on the domain name you want to purchase.
On the next page, you will see that there are 2 emails under your domain: info@ and sales@.
If you want to change all shopify emails and email addresses, you can modify them here. Click the trash can icon here to delete the current email, and click to confirm the deletion.
If you want to add other emails (for example, change customerservice@ or support@), you can click here to "add email address". Enter the email address.
Choose Shopify theme
Shopify's theme design is the facade of your shop. Make sure that the theme is browsed on the mobile and computer terminals, conforms to the public's aesthetics, and is user-friendly.
The default theme name is "debut". Shopify provides free themes and paid themes, you can choose according to your needs.
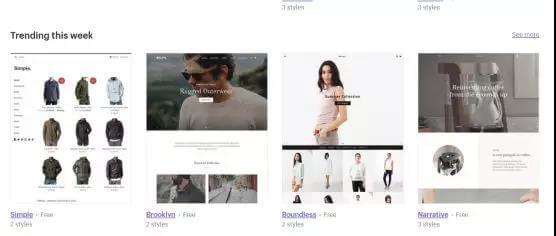
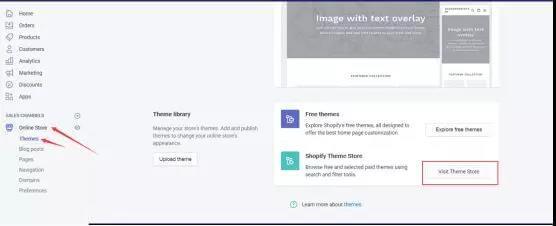
If you want to change the theme of the store, go to the store control panel to set it.
To browse and change the theme, follow this step:
Login>Themes>Access>Theme Store
After confirming "install theme", click the "publish as my store theme" link to complete the change. If you want to install the theme without overwriting the current theme, click the "Publish as My Store Theme" link.
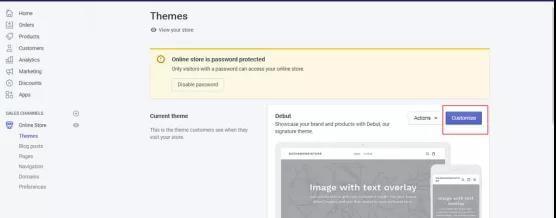
Use the "Go to Theme Manager" button to customize the new page, this button allows you to enter the shopify page, and click the button to change the theme.
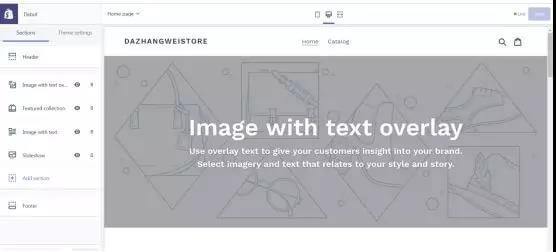
After clicking the "Custom Theme" button, you will enter a page where you can edit the theme.
On the sidebar page, you can see many parts to edit the website. Click on a certain part, and you can see various options for customization.
Add store page
To tell shopify that you are building a store, you should create a page to notify visitors of the entire content of the page. It is recommended that you should create the following page:
- About Explain your store to visitors and suppliers, and try to be as substantial and comprehensive as possible.
- Products Display the store's products and collection lists, and explain the advantages of your products.
- Shipping Please pay attention to the shipping length of each order (large or small). Before the customer buys, tell the customer the details of the store's logistics and shipping.
- Returns Explain the return policy and inform the customer of your preferential policy and detailed return method.
- Contact In addition to the detailed introduction above, you also need a contact page to promptly solve some of the customers' problems before and after purchase.
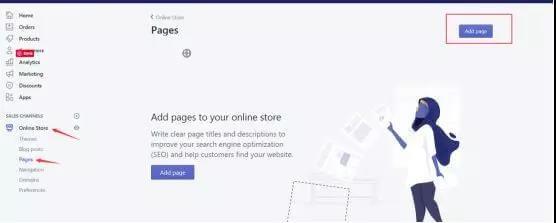
Go to the "Pages" section in the online store category and start adding new pages.
Click the "Add Page" button, you can create a new page in the store, select and set the format of the text editor according to different methods, and it is easy to edit.
Edit the about page
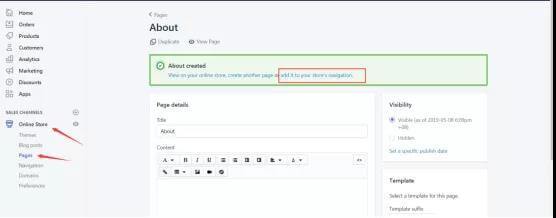
Due to the need for more natural search engine traffic, the SEO authority of the page must be changed. Click the "Edit SEO Site" link and scroll down. Edit the meta title and description to attract more users to click when the search results appear. Save the completed page.
When you save the newly created page, click "Add it to the store navigation", so that you can directly enter the navigation page of the website after the page is created, so that visitors can easily view this page.
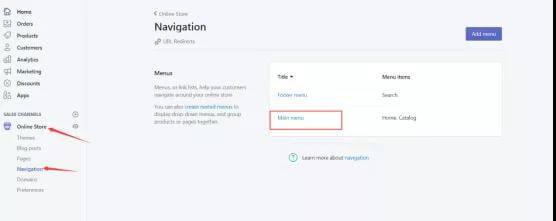
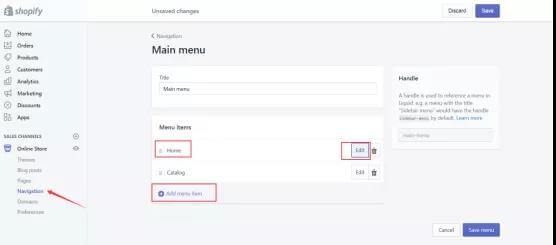
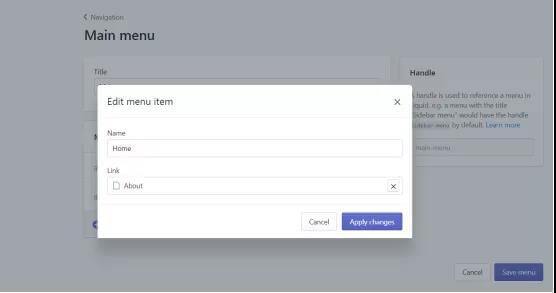
Example: Add the "about" page to the list on the main menu page.
Steps: Click on the navigation bar of the online store, click add menu items, edit the page name and linked pages here, and click "Apply Modifications" after finishing the modification.
Operate the above step on all pages of the built website.
Step 5: Upload products
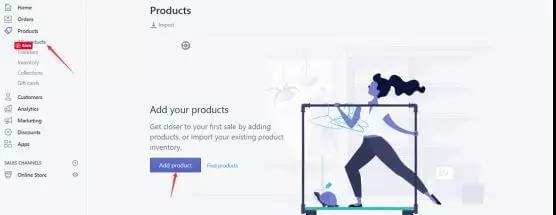
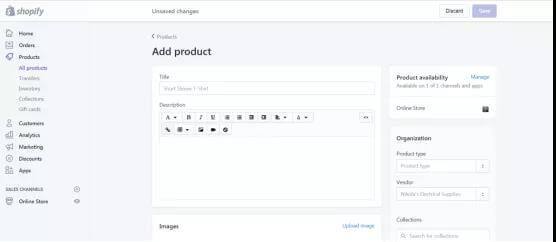
After configuring the basic settings of the store, it is time to upload products to your store. Click "Add Product" to enter the add product page.
After entering the product page, fill in the product details. You can also refer to the description provided by the supplier and edit and modify it based on it to increase the attractiveness of the target market.
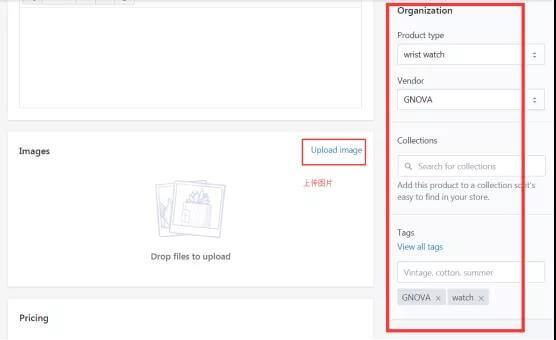
Under the organization on the right column, you need to modify the product type and supplier to classify the product. You can also add this product to the collection so that similar products can be packaged together and displayed to customers.
Finally, enter the keyword tag of the product, and the user can find it in the search bar.
Below the product title and description is the area for uploading pictures. You can upload all pictures provided by the supplier. Pay attention to ensuring the quality of the pictures. High-quality pictures are more attractive to customers.
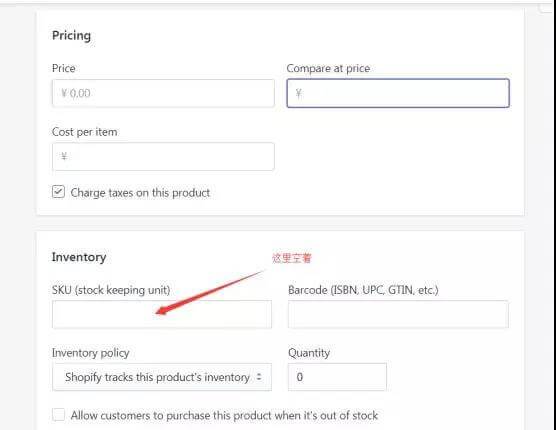
Enter the price based on the pricing you researched. I compared the watches sold on Amazon and the final price was $20. You can consider raising the price reasonably to increase profits.
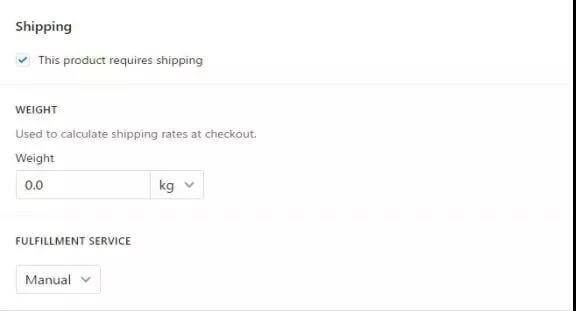
As for the logistics, you can leave it empty and the supplier will manage it. However, you must negotiate with the supplier the way of order execution and the timeliness of delivery.
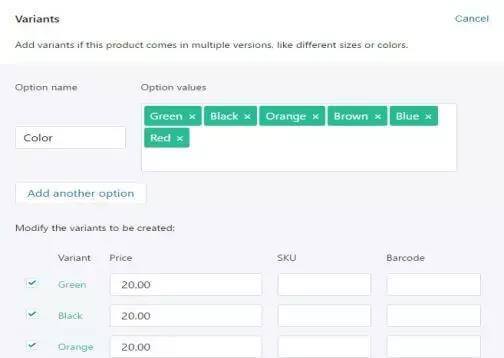
After setting the shipping page is the Variants page, where you can set product variants. Add the color, size and other characteristics of the variant product. The variant product increases the chances of people's choice and helps increase the conversion rate.
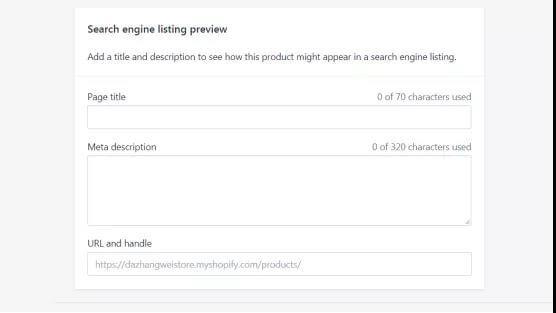
Finally, to edit the search engine list, click the "Edit Website SEO" link and enter the title, meta description, and URL here.
If the page title has enough characters, you can consider adding the name of your dropshipping shop at the end. The description should be as detailed as possible and attractive enough.
This way customers will click on your link when browsing search results. In fact, you can edit the URL and shorten it to a short link using bitly. Also consider the keywords used for optimization on this product page.
You can use SEM Rush to find keywords that are easier to score and increase the chances of getting more scores on Google or Bing. Save the product after completion.
This is a series of processes for uploading products in Shopify, and other products can be added according to this process.
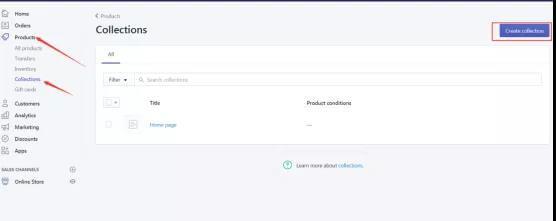
Automatically add products to the collection
The advantage of creating a collection of goods is that you can separate products that are connected by the same brand, type, theme, or other factors.
Enter the name and description in the first half of the "collection" page, consistent with the supplier's description. Provide users with sufficient product information, as detailed and substantial as possible.
Then all the products you want to sell must have pictures, while ensuring the quality of the pictures. Newly created product pages are automatically added according to specific conditions, so that products can be added to the collection more easily.
You can choose between product type, price, seller, label, and other products, so your collection does not need to be added manually.
Collection can include a product from multiple conditions. Finally, edit the SEO page to let more people click on the search result link. Click the Save Collections button when finished.
Step 6: Add payment method
Provide customers with as many payment methods as possible, and they can choose one of them, otherwise it would be a shame to lose customers because of the payment method.
PayPal and credit cards are generally used. Use a credit card to pay directly through Shopify-no need to set up a payment method.
Shopify Payment
One of the biggest benefits of Shopify Payment is that it can track all transactions made by the store.
Shopify payment is not available in all countries and regions, and PayPal payment can be considered for regions that cannot be used.
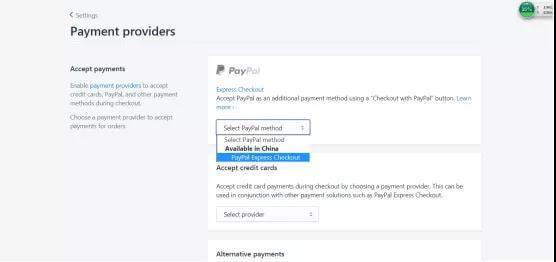
In shopify settings, click payment providers, and select Paypal for quick payment. All purchases on Shopify use Paypal to pay quickly by default, and there is no handling fee for payment by credit card.
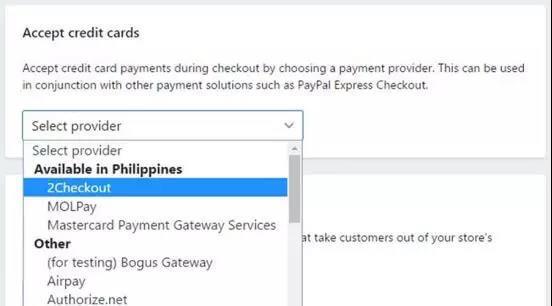
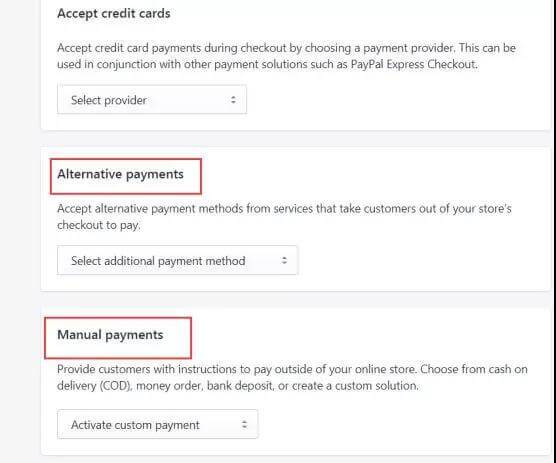
For credit cards, if you want to accept payments through a third-party processor, you must select from the list in the "Accepted Credit Cards" section. If the gates you choose are already subscribed, you only need to select payment gateways from the list.
If not, register gates. You need to fill in all the options and select from the list, then you can accept credit card payments through gates. To add more payment options, see other payment methods under "Alternative Payments" and "Manual Payments."
Step 7: Configure store shipping
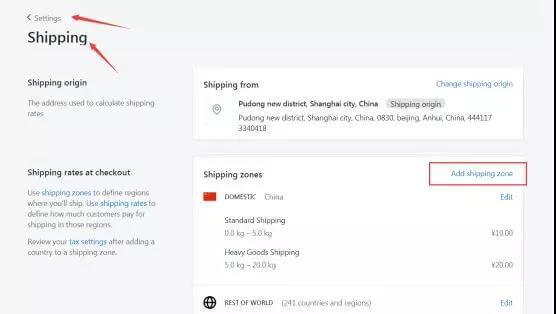
Adjust the delivery rate based on the products sold to provide accurate pricing.
Steps to configure shipping rates: Login> Settings> Zones and Rates
According to the following indicators, calculate the freight:
Freight: Check the transportation price of local and international transportation according to the size and weight of the goods. Pricing usually varies based on several factors.
Surcharges and quantities: expenses necessary for other reasons, such as transferring goods at the customer’s door.
Supplier's fee: It needs to be paid to the supplier first as the cost of preparing the product for shipment.
Because the various conditions are different and there is often no universal rate, the above factors must be considered comprehensively before negotiating the configuration of the freight with the supplier. In addition, additional transportation methods can also be considered.
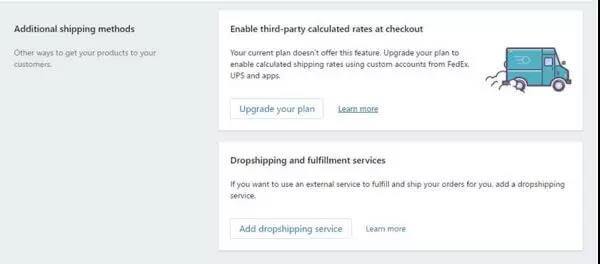
In the "Add shipping method" section of Shopify, if you have a shopify plan or higher, you can enable the calculated third part rate when you exit.
You can automate the transportation cost calculation process, so there is no need for clearing and manual input. To solve the supply problem of dropshipping, you can add a dropshipping service.
Then all orders can be forwarded to the supplier for processing. You can also use the Shopify app, Amazon Rakuten and Fulfillments to provide you with logistics services.
Step 8: Add gift cards and discount codes
For customers who don’t know which product to buy, setting up a gift card or discount card is good. By assigning a specific amount to each card, the final accumulated amount can be used to redeem designated products.
Shop owners can buy their own gift cards while selling other products, and customers who just bought cards from your store can also get gift cards. Gift cards are a great way to increase sales.
Gift card
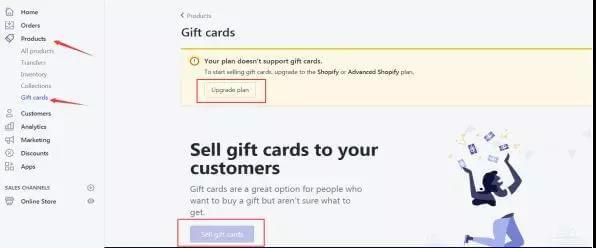
operation steps: Go to Products>Cards on the sidebar menu to create a shopping card, and then click "sell gift cards".
But you need to have a higher version of Shopify plan to use this feature.
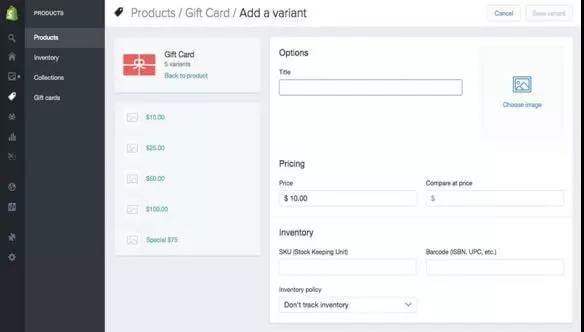
After upgrading, enter this page:
After you create a variant, you can save the gift card in the "Online Store" area under the "Visibility" section. You can also send gift cards based on customer loyalty.
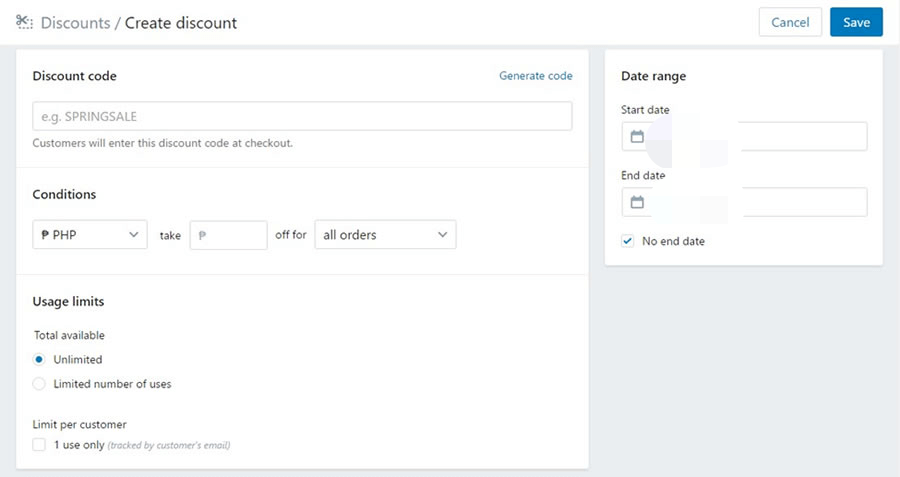
Discount codes Use discount codes to purchase products at lower prices. By sending discount codes to visitors, you can convert visitors into your customers and increase sales.
Go to the discount on the side menu and click "Add discount". Fill in the details. Also set up editing terms and usage restrictions to ensure that there is no excessive use of discount codes.
After creating the discount code, it must be promoted in the store before it can be used in the transaction. What about promotional discount codes?
Promote on social media : Share the discount code to Facebook, Twitter and other social media.
Write a blog post: Publish a blog, detailing product discount codes and how to use discount codes. There is a little trick, don’t share the code directly on the blog, but share this blog on social media, and then send a discount code on social media to increase traffic.
Create pop-up windows: Pop-up windows are a great way to create email lists and drive website traffic to specific pages. The pop-up window can be dynamically displayed on each page of your shop.
Send emails to subscribers-If you only want to send discount codes to people who registered your email, then you can send these discount codes through email marketing platforms. Use discount codes to encourage people to sign up.
Although discount codes help drive sales and increase store revenue, don’t always offer discount codes. Giving discount codes indiscriminately will lose loyal customers and cause sales to decline.
Step 9: Set customer service options
Although a lot of shopify store information has been set up before, customers will still ask many questions during the operation of the store.
So you need to have a customer service function that can solve the problems raised by customers in time. ZenDesk is one of the best tools to provide a complete package.
Phone: Use ZenDesk's phone function to allow customers to communicate product information. It can also record the history of customers. Automatic creation of tickets and call records can help solve problems and reduce workflow.
Chat: The purpose is to allow users to quickly answer questions about the store, and chat support allows them to get help from messaging agents. Provide a better user experience by solving problems immediately, while increasing sales.
Knowledge base: A customer portal can be created to integrate a knowledge base based on the questions received by users and callers. The knowledge base is a one-stop guide for all potential problems or issues that customers face, so they don’t need to talk to your agents or send emails.
Social media: Many people prefer to receive responses on social media and apps. You can use ZenDesk Message to answer their questions on their favorite apps and platforms.
According to different functions, ZenDesk has very flexible prices. For $5 a month, you can get support from email and social channels, basic support centers, and widgets on the screen.
This is great for shops that are just starting dropshipping. If you want more features later, you can upgrade the plan to accommodate more features, such as performance panels, multiple ticket forms, and so on.
ZenDesk provides a 14-day free trial version for each plan so that you can test it and see if it can be the platform of choice for all customer support needs.
If you think ZenDesk is too big for you, you can also choose other smaller tools:
Drift: A real-time chat tool, displayed as a floating button on the access page. Facilitate questions, answers and comments.
Grasshopper: If you want to call a customer, this tool allows you to create a 1-800 branded phone or local number and send it to your mobile phone or support team.
Hootsuite: View all social media profiles in one place and respond to all parties from the central control center.
All of the above tools can bring you more customers and achieve better conversion rates.
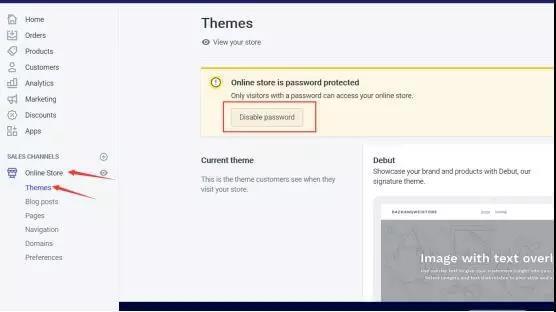
Step 10: Start the store
So far, your store has been modified, but you still cannot access your store publicly. This is because the store is password-protected and is still in the stage of building a store before the target audience can view it.
You need to remove the password protection to open business. After completing the above steps, the site can be published and made available for public access.
After clicking the button, you will go to the "Preferences" Preferences page section. You just need to uncheck the "Save password" box on this page and click "Save".
After the store management
completes all the above steps, you can start operating the store.
The next step is actually the method involving traffic
How does the traffic come, wow, I have written a lot about this
Such as SEO, Facebook advertising, affiliate alliance, celebrity marketing... Every point in this is a huge piece of knowledge.


Comments
Post a Comment